 Profinet slave device object for frequency converter ABB ACS880.
 This Node object works together with a Plant object ABB_ACS880_Pn_1.

 The FENA-11 Ethernet adapter (Fig 1) module is an optional device for
 ABB drives which enables the connection of the drive to an
 Ethernet network, in this case Profinet IO and ABB drives profile.

 This ProviewR configuration requires the Profinet adapter module is
 placed in the driver slot A also named 'FBA A' (Fieldbus Adapter Module slot A).

 Fig 2 below explain the diagnostics LEDs on the FENA-11 adapter.
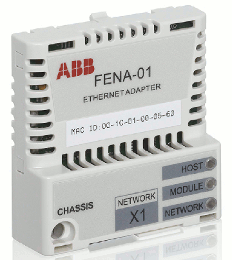
Fig1
Description from ABB manual.

Fig2
Configuration
 A lot of configurations steps has to be done through several tools:

  1  Creat a master profinet object PnControllerSoftingPNAK in ProviewR workbench,
     see classhelp PnControllerSoftingPNAK for more help.

  2  Create ABB_ABB_ACS880_PnDevice object in ProviewR workbench node hierarchy.

  3  Create module and Io object and XML file through 'Configure Device tool'.
     Give the attribute DeviceName an unique name and IP adressa and a net mask.

  4  Set the devicename in FENA-11 through 'Profinet Viewer' tool in terminal window.
     Every device in a Profinet IO network needs an unique Device name.

  5  Set some parameter groups in the ABB driver ACS880:
     choose Protocoll/Profile Profinet IO and ABB drives profile, IP adress and a net mask.

  6  Configuration of NIC (network interface controller) in ProviewR master station:
     IP adress, net mask and a MAC adress. In this case eth1 is choosed as a NIC.

  All this steps except step 1 are describe here.

 See also ABB_ACS880_Pn_PPO7_V1_IoModule for more information about
 the IO data that will be transmitted or received.

 Configuration of ACS880 parameter groups inside the driver you will find in classhelp
 ABB_ACS880_PnModule.
Configuration ProviewR
 Before configuration step 1 and 2 below you must have a unique device name for FENA-11
 and an IP adress and a net mask. Via tool 'Profinet viewer' in a terminal window you can
 read and set the device name, see 'Configuration via Profinet Viewer' below, example 9-12
 for more help.
Step 1
 Select the slave object ABB_ACS880_PnDevice and place it below  a Profinet
 master object 'PnControllerSoftingPNAK' in the node hierarchy.
Select class ABB_ACS880_PnDevice in the palette
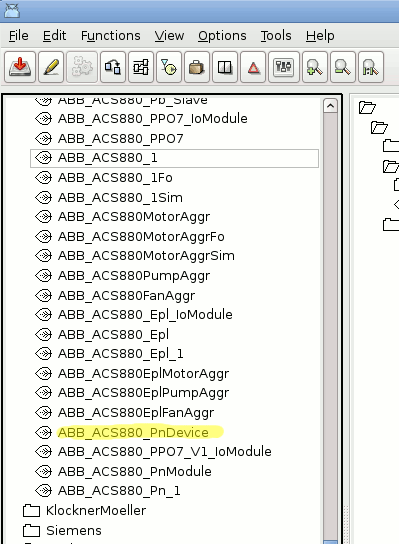
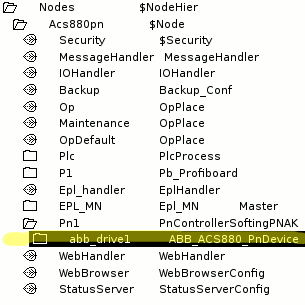
Step 1 The result, i.e. device is placed under the Profinet master.
    It is good idea to name the object the same name as the FENA-11 device
    name, in this case abb_drive1.
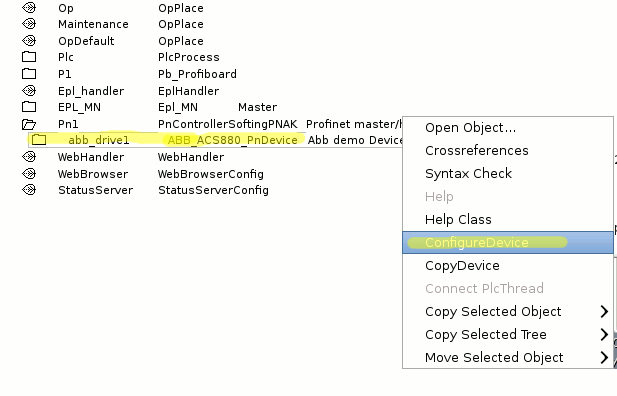
Step 2
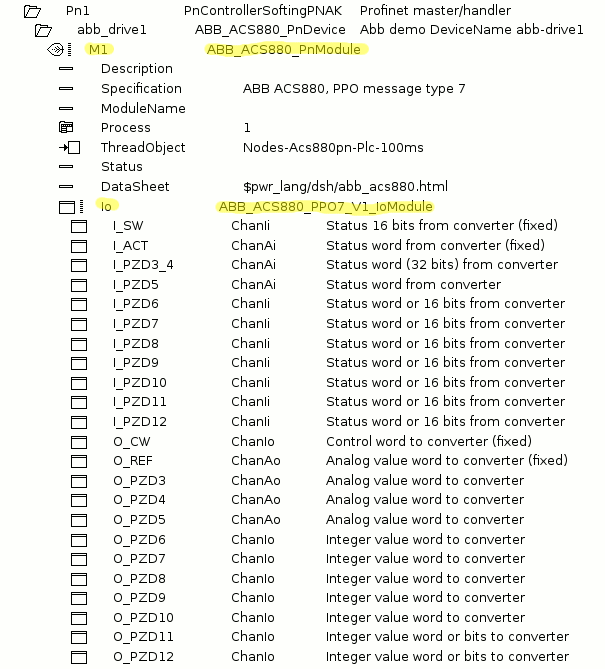
 This step will end with one new ABB_ACS880_PnModule containing one sub object
 ABB_ACS880_PPO7_V1_IoModule under the current object and one XML file located
 in $pwrp_load.

 Use the 'Configure Device' method in the popup menu of the object
 to configure the slave device and create the XML file.
Example 2 start Configure Device Tool
Step by Step (see example 3 settings via config device tool below):
 1  Do the NetworkSetting similar as in the example.
 2  Select the setting ReductionRatio to 16.
 2  Change the setting ByteOredering LittleEndian to BigEndian.
 3  Select inside Device 'FENA-11 PPO Types' as Module Type
 4  Select Inside Slot 1 ModuleType 'PPO Type 7'.
 5  Select Inside Slot 1 ModuleClass 'ABB_ACS880_PnModule'.
 6  Inside Subslot change the setting as in the example.

 7  The device XML file and all class objects will automatically be generated
    When Apply or Ok is pressed i.e. one ABB_ACS880_PnModule object will
    be generated containing one ABB_ACS880_PPO7_V1_IoModule object. The XML file
    is saved under $pwrp_load with prefix pwr_pn and object id, see example 5 and 6.

 8  Done
 9  See also plant object class ABB_ACS880_Pn_1 how to IO connect.

   Example 3 Shows the settings via config Device tool, example 4 shows the
   result in the node hierarchy.

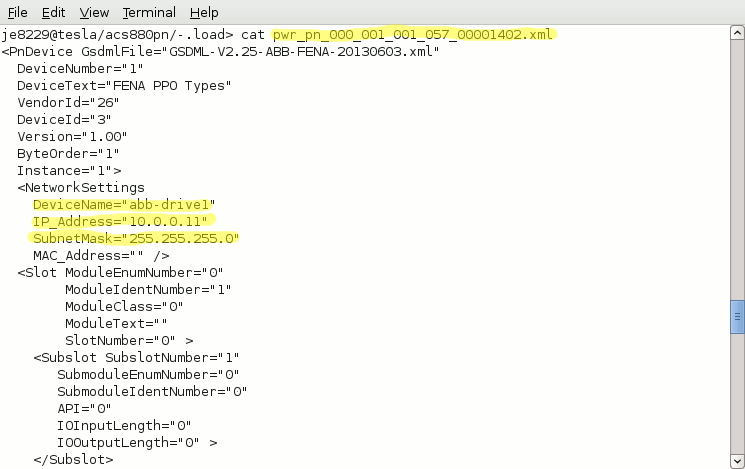
   Example 5 and 6 describe some stuff about the autogenerated XML file.
Example 3 Settings via config Device tool

Example 4 Shows the results in the node hierarchy
Example 5 find out the XML file.
 Do the 'show objid' command in ProviewR command line and convert the last four objid digit
 from decimalt to hex format and you have the end of the generated XML file. In this case
 5122 is converted to hex 1402 and the file name will be 'pwr_pn_000_001_001_057_00001402.xml'

Example 6 Generated XML file 'pwr_pn_000_001_001_057_00001402.xml'.
The figure shows the most important settings from the autogenerated file.
Configuration via Profinet Viewer (case study)
 After the adapter module FENA-11 has been initialized by the drive ACS880, the
 ProviewR master station must be prepared for communication with the module.
 To do this you must identify, read and change the DeviceName via a tool
 'Profinet Viewer'.

 The main parameter:

  1  Slave/device name: abb-drive1
  2  Slave/device Ip adress 192.168.90.11 and mask 255.255.254.0

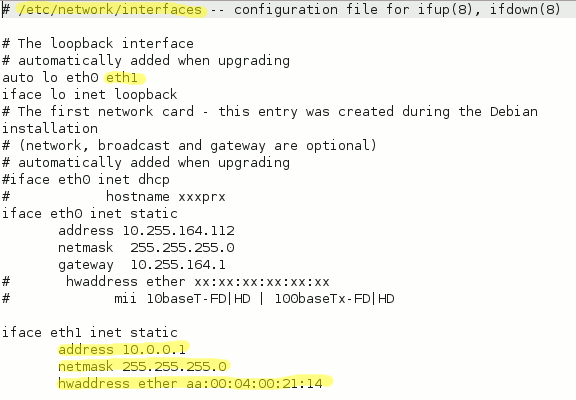
 Before starting the Profinet Viewer the NIC configuration in this case are
 done like example 9 below, i.e. ProviewR master station ip adress 192.168.90.1,
 mask 255.255.254.0, HWaddress aa:00:04:00:21:14 and ethernet interface eth1.

 Note The HWadress must be between an interval specified under the Profinet master
 class object PnControllerSoftingPNAK,
Example 9 Ethernet interface settings in file /etc/network/interfaces
 The tool 'Profinet Viewer' is started in a terminal windows by issuing the command:
 profinet_viewer [device] Where 'device' is for example eth0. By default the
 profinet viewer will connect to eth1.

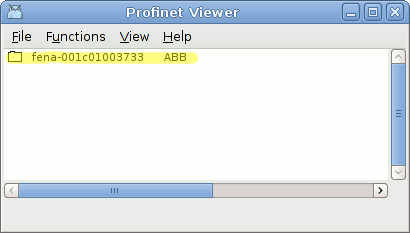
 The Profinet Viewer displays a list of the current devices on the Profinet
 fieldbus/circuit. In this case example 10 we have only one device ABB
 FENA-11 Ethernet adapter.

 One way to identify the FENA-11 unit in the network is to read the mac adress label
 on the unit and find the same mac adress via Profinet viewer.
Example 10 show the list of the current devices
Set devicename and ip address
 When a device is exchanged the devicename of the old device has to be set to the new device.
 In some cases the ip address has to be set as well. Also when a device is configured for the
 first time, the device name and meyby ip address has to be set on the device.

 In this ABB case it is only neccecery to set the DeviceName. The Ip adress will be set by ProviewR
 (XML file) during the start up and detection of slave/device abb-drive1.

 The steps to set the device name for an ABB ACS880 frequency converter:
1 NOTE Stop ProviewR runtime environment on the current node before you start the viewer.
  2  Start the Profinet Viewer, command: profinet_viewer (default eth1).

  3  Find the new device in the list of devices (identify the mac adress).

  4  Open the device and enter the new name abb_drive1 in DeviceName, by selecting DeviceName
     and press the Arrow Right Key. An input field is opened where the new name is entered.

  5  Select the device and activate Function/Set Device Properties in the menu. Now the
     new name is transfered to the slave device node.

  6  Activate Functions/Update to update the list and check the settings of the new device.

  7  Done
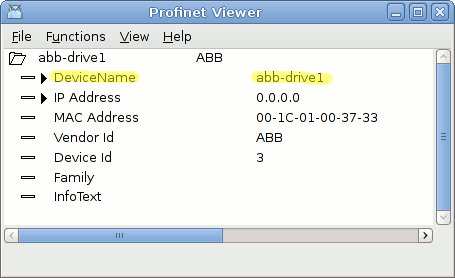
Example 11 shows the result of the correct Devicename abb-drive1 after
Set Device Properties and update.
Configuration of ABB driver ACS880
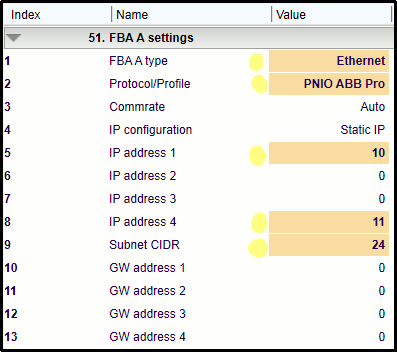
Example 12 shows the setting in ACS880 parameter group 51.
 The Ip adress 1-4 and Subnet CIDR setting (24 = 255.255.255.0) is not necessery due
 to settings in the ProviewR master station and the auto initiate , but it is recommended
 to do it. The orange colored field in the example is not default setting in the driver.
 Configuration of other ACS880 parameter group you will find in classhelp
 ABB_ACS880_PnModule.
See also


